Thursday, July 28, 2011

Holding the Camera

We may have a very expensive high end camera, but if we do not know how to use it, then it is of no use. The first thing that we need to learn as a photographer ( rather amateur photographer :D ) is how to hold the camera. Most if us have point and shoot cameras which are difficult to use when compared to DSLR (Digitial Single Lense Reflex) cameras that are very easy to hold and take a picture avoiding camera shake. Holding your camera still is essential, especially with point-and-shooters, which take some time to focus and capture an image. What makes it even difficult to use these point to shoot cameras is slow shutter speeds. So how to we hold these slim and sleek , cigarette pack sized cameras firmly to a decent picture with out the camera shake?? Here are some of the tips from the experts


  • Hold your camera firmly with your right hand and use your left hand for support from beneath or side to avoid shaking when you click the shutter button. This is very useful when you are holding the camera in the standard horizontal position before you eye.


  • Try to get support from your surroundings. Take a look at the following picture where the photographer used the table for support. She placed her elbows on the table to get a firm support and to avoid shaking which will generally happen while pressing the shutter.


  • If nothing is available make use of other parts of the body apart from your hands.You can tuck your elbows tightly into your ribs for support. 
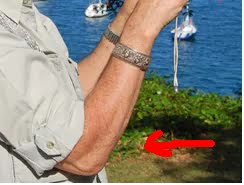
It may be uncomfortable when you try it for the first time. But to get a good picture you need to get uncomfortable some times :).


Now these are some of things that you can do to avoid blurry photos. But there are some things that you should avoid doing when using these compact cameras, like
  • Do not keep the camera away from your eye at arms length. When you stretch your arms the chances of shaking your hands while taking a picture increases.
  • Do not use high zoom levels. At high zoom levels even a small moment of your hand may result in blurry picture. Try to get as close to the subject as possible.
  • Do not zoom while taking the picture. First select the zoom level that you want and then take the picture with firm hand position.

Refer the following links which provide lot more information on how to use your point to shoot cameras.
  • http://www.travelsignpostsphoto.com/basic-stuff/the-war-against-blurry-photos-holding-your-point-and-shoot-camera
  • http://www.pcmag.com/article2/0,2817,2278962,00.asp
  • http://photo.net/learn/point-and-shoot-tips
Hope you find this information helpful. Happy clicking :D

Thursday, July 21, 2011

Rule of Thirds

The rule of thirds is one of the most important rules of photographic composition.The rule states that an image should be imagined as divided into nine equal parts by two equally-spaced horizontal lines and two equally-spaced vertical lines, and that important compositional elements should be placed along these lines or their intersections.

The below picture shows how we divide the image into 9 parts, and according to this rule we need to place the subject in the image at the intersections of these lines ( Red spots in the image below ).


The Rule of thirds is similar to the Golden Mean rule ( also know as the divine proportion). The theory is that if you place points of interest in the intersections or along the lines that your photo becomes more balanced and will enable a viewer of the image to interact with it more naturally. Studies have shown that when viewing images that people’s eyes usually go to one of the intersection points most naturally rather than the center of the shot – using the rule of thirds works with this natural way of viewing an image rather than working against it.The main reason for observing the rule of thirds is to discourage placement of the subject at the center, or prevent a horizon from appearing to divide the picture in half.

Look at the following links that explain about this rule

http://en.wikipedia.org/wiki/Rule_of_thirds
http://www.digital-photography-school.com/rule-of-thirds


Saturday, July 16, 2011

White Balancing

Apart from Shutter speed, Aperture priority and ISO we have one more setting called White Balance. It is also known as Color balancing. Most of the us would not have tried it out.

It is a way to correct all the colors in your image to take account of the light they were shot with. Simply put white balancing is about telling the camera how each color looks in different light conditions. We need to set the white balancing correctly to get the colors in the image as accurate as possible. Most of the digital cameras have Auto White Balancing option, but it may not give you correct colors in all light conditions.

For white balancing the camera has to take into account the "color temperature" of a light source, which refers to the relative warmth or coolness of white light. We will look at it later. Our eyes are very good at judging what is white under different light sources, but digital cameras often have great difficulty with auto white balance (AWB). If the white balancing is not adjusted correctly it creates unsightly blue, orange, or even green color casts. Understanding digital white balance can help you avoid these color casts, thereby improving your photos under a wider range of lighting conditions.

Apart from AWB all digital cameras provide wide range of options for different light conditions. These presets may not always work perfectly. We can custom adjust the white balancing to get most accurate colors in our image. While using custom adjust all we need to do is point the camera to a white spot in the shot to let the camera know how white color looks under the present light conditions. Depending on how white color looks the camera then will decide how all the other colors look. Look at the table below showing different presets that are provided by most of the digital cameras.


Auto White Balance
Custom
Tungsten
Fluorescent
Daylight
Flash
Cloudy
Shade

  • Auto – this is where the camera makes a best guess on a shot by shot basis. You’ll find it works in many situations but it’s worth venturing out of it for trickier lighting.
  • Tungsten – this mode is usually symbolized with a little bulb and is for shooting indoors, especially under tungsten (incandescent) lighting (such as bulb lighting). It generally cools down the colors in photos.
  • Fluorescent – this compensates for the ‘cool’ light of fluorescent light and will warm up your shots.
  • Daylight/Sunny – not all cameras have this setting because it sets things as fairly ‘normal’ white balance settings.
  • Cloudy – this setting generally warms things up a touch more than ‘daylight’ mode.
  • Flash – the flash of a camera can be quite a cool light so in Flash WB mode you’ll find it warms up your shots a touch.
  • Shade – the light in shade is generally cooler (bluer) than shooting in direct sunlight so this mode will warm things up a little.
Look at the following links for more information on White balancing.
  • http://www.digital-photography-school.com/introduction-to-white-balance
  • http://www.cambridgeincolour.com/tutorials/white-balance.htm
  • http://www.pixiq.com/article/white-balance

Sunday, July 10, 2011

Black and White Photography

Some times colors may be distracting...

Most of the photos we see around are in color and we seldom see black and white photos. Beautiful pictures can also be taken in b/w mode. When taking a picture in b/w mode the photographer need not worry about the color combinations in the picture and can concentrate on shape and form of the object.

With b/w photography we can bring out textures, patterns and contrast shades in the image. The important thing that need to be considered while taking pictures in b/w is to select the subject. Most subjects in nature can be captured beautifully in this mode.

You can use a moderate ISO value while taking these b/w pictures as it will capture a number of shades that are in the image. But take care of the noise it induces. With b/w pictures we can clearly bring out the shadows of the subjects in the image allowing us to capture great images.

The one more thing that need to be taken care is the surrounding light. The surrounding light is crucial as it will bring out different shades, and these shades make a b/w photo lively. It is suggested not to use flash in this mode as it may induce more light in the image making it bright.

Although some cameras have a black-and-white function, it's best to shoot in colour and convert to monochrome using photo editing software. This gives you more control over the image as you can use information from any or all the color channels.Look at the following link for more information related to b/w photography.

http://www.photographymad.com/pages/view/5-essential-tips-for-black-and-white-photography

Thursday, July 7, 2011

ISO Settings

Apart from Aperture priority and Shutter priority we have another setting that can be adjusted in all most all the Digital Cameras, and it is the ISO value. ISO stands for "International Organization for Standardization" and in the world of cameras it refer to the speed or sensitivity of the film. Even though the Digital cameras does not have a film in it, the option to adjust this ISO value is provided. This may seem a little confusing but it has its own advantages.

The Sensitivity or the Speed of the film determined the time for which the film has to be exposed to the light to capture the image completely. Sounds confusing ?!! Low sensitivity means that the film has to be exposed to light for a longer period of time than a film with a high sensitivity in order to properly expose the image. In digital photography the ISO value indicated the sensitivity of the image sensor in the camera. You can find more information about ISO in the following link

http://www.photography-basics.com/2007/02/what-is-iso/

The ISO settings has to be changed depending on the available surrounding light. High ISO settings are used in darker conditions as the sensitivity of the film to light is high then. Higher ISO settings can be used in closed indoors or at places where flash is not allowed. It is always better to take pictures with lower ISO setting when you have good light around. High ISO introduces noise into the image giving it a grainy effect. Look at the following image taken at high ISO value of 1600.


The image here looks fine, but when in at high zoom levels you can see the granular effect. This can be reduced by using less ISO value. Look at image below showing the difference in the image before and after reduction of noise. Here I have manually removed the noise from the image using a photo editing tool. Click on the image for better view.


Wednesday, July 6, 2011

Shutter Priority

The Shutter Priority mode is another Semi-Automatic mode where user can set the shutter timing and leave the Aperture Priority to the camera. The Shutter open time determines the amount of time for which the shutter is opened and in turn it determines the amount of light that comes through on to the film. Amazing pictures can be taken with this mode. Look at the picture below.


The Shutter speed determines the amount of time for which a image is captured. If you want to capture a fast moving object you need to use high shutter speed of 1/250 sec. Setting shutter speed to this value means that the shutter closes in 0.004 sec and captures the image in that time making it easy to capture a moving object. See the below picture of a moving car.


But the fun begins when you take a image with slow shutter speed allowing the camera to capture a image for long time. If you see the first image, it is taken a low shutter speed of around 1/8". With this low shutter speed the image is captured for longer time giving us a sense of motion. Look at the following link for some pictures taken in this mode.

http://photo.tutsplus.com/articles/inspiration/50-stunning-slow-shutter-speed-images/

Different shutter speeds are supported by mostly all the high end cameras. The Possible shutter speeds are 8", 4", 2", 1", 2, 4, 8, 15, 30, 60, 125, 250, 500, 1000, 2000. Thus, the fastest and slowest shutter speeds are 1/2000 sec and 8 seconds.

Look at the following link for more information about the shutter speed and different kind of photos that can be taken in this mode.

http://www.all-things-photography.com/shutter-speed.html

Sunday, July 3, 2011

Aperture Priority

In all the digital cameras we have many options to select while taking a photo. Usually many users only use the Auto mode as it is easy to use. Auto mode tells your camera to use it’s best judgement to select shutter speed, aperture, ISO, white balance, focus and flash to take the best shot that it can. With some cameras auto mode lets you override flash or change it to red eye reduction. This mode will give you nice results in many shooting conditions. But most people does not know how to use the other modes. The 3 main important modes other than the Auto mode is the "Aperture Priority" , "Shutter Priority" and the "Manual" modes. Here is some information about the Aperture Priority Mode.

The Aperture priority is the mode where we set the Aperture setting manually. To understand this you need to what Aperture is. You can refer to the following link to better understand what it is.

http://www.mir.com.my/rb/photography/fototech/apershutter/aperture.htm


If the Aperture is high the exposure to light is high, so more amount of light passes through on to the film. By adjusting this aperture we can control the brightness of the picture taken. The following picture is taken with high aperture allowing brighter picture. The Aperture is measured in terms of "f" value, like "f/1.8" "f/4.0" and so on.

The Aperture priority setting not only controls the amount of light that comes in, but also some thing called "Depth of Field". In simple terms it will help you in adjusting you focus on the subjects in the image. If the Aperture is high all the subjects in the image are focused and vice-verse. If you want to take a picture with good focus on every subject, you need to have high aperture like "f/1.8" or "f/1.4". But if you want to focus only a single object you need to use lower aperture like "f/16" or "f/22". Refer to the following link for more information.

http://www.mir.com.my/rb/photography/fototech/htmls/depth.html

See the following picture which is taken with low aperture to focus on a particular subject on the image.